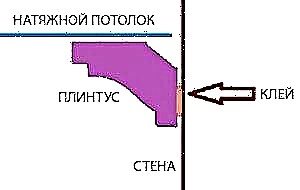
Plinths are mounted on suspended ceilings in order to hide the hole that forms between the wall and the canvas covering the ceiling surface. If this is not done, the room will have an unfinished, sloppy appearance.
The plinth, or fillet, is a strip of polymer material. It can be narrow or wide, with or without a pattern. The common thing for all skirting boards for suspended ceilings is only one thing - one should be fixed under the ceiling, closing the technological gap.

Features of installing a skirting board to a stretch ceiling
There are special skirting boards that have protrusions for mounting directly in the mounting profiles, to which the tension web is attached. However, the choice of such models is quite limited, so most of the manufactured skirting boards are mounted on glue.
Why it is impossible to glue a ceiling plinth to a stretch ceiling directly? There are at least five reasons for this:
- The stretch fabric is made of polyvinyl chloride film, quite thin, which can sag under the weight of the plinth,
- The solvents included in the adhesives can damage the film or even make holes in it,
- It is impossible to glue the skirting boards on the stretch ceiling, since the film does not fix rigidly and can easily change its position - a reliable adhesive bond does not form under such conditions,
- Drying, the glue will create a tension that is unlikely to be uniform - the ceiling canvas "leads", it forms folds, wrinkles,
- If necessary, remove the skirting the ceiling canvas will inevitably be damaged.
 In order to glue the ceiling plinth to the stretch ceiling, that is, to the wall under it, and not be afraid that it will quickly detach, it is better to purchase skirtings with the maximum possible width of the surface adjacent to the wall - this will provide reliable adhesion and the skirting board will hold well. The length of the baseboard as a whole depends on the shape and size of the room. The most common skirting boards are 1.3 m long, although two-meter models can be used in large rooms.
Important: When buying a skirting board, take all the necessary quantity at once, and make sure that the lot number is the same, otherwise the individual parts may differ in shade.
Skirting board calculation
Check if you have enough skirting boards. The calculation is simple: to the total length of the perimeter of the room you need to add a margin for corners (about 10 - 20 cm for each corner). The resulting result is divided by the length of the plinth (standard length - 200 mm) and find out the required amount.
Installing a skirting board for a stretch ceiling
Usually, any additional elements that serve as decor are first fixed in place, and then painted, if necessary. However, there are some subtleties: if the baseboard is located close to the canvas, it can be stained when painting, so it is recommended to paint first, and only then begin installation.
Before attaching the baseboard to the stretch ceiling, you need to purchase tools for this work:
- Stationery or construction knife,
- Measuring instrument (ruler, tape measure),
- Putty knife (preferably rubber or plastic),
- Pencil,
- Brush,
- Miter box (for smooth joints in the corners of the room).

In addition, the following materials will be required:
- Baseboard
- Adhesive for plinth (selected according to the material of which it is made),
- Sealant (preferably acrylic),
- Lining made of polyethylene (cling film).

To attach the baseboard to the stretch ceiling, you will also need a stepladder and a napkin to remove excess glue. Begin work with preparatory operations. First of all, protect the stretch ceiling from accidental scratches and stains. To do this, attach a thin cling film to it around the perimeter of the room.
Tip: To qualitatively and beautifully connect the skirting boards in the corners of the room, you can buy special curly “corners”. In the event that there are no suitable "corners" on sale, they are made with the help of a special tool - a miter box - and an ordinary sharp knife.

The miter box is a rather rare tool, it is not necessary to purchase it “at once”. A home-made miter box can be made of three boards, building from them something like a tray, the inside of which should be equal in width to the width of the plinth. Then arm yourself with a protractor and cut a hole in the sides of the tray at an angle of 45 degrees.

To glue the baseboard to the stretch ceiling, you need high-quality glue. It is better if it is transparent (in a pinch - white). One of the main requirements for glue - it should not darken over time. Most often, Moment glue is used for such work: Installation and Super Resistant, as well as Titanium.
Preparatory work
- Lay the skirting board along the floor along the walls. For long walls, put two skirting boards, for short ones - one at a time. Place the cut-off parts of the baseboard in the remaining places. Try to ensure that those parts that you cut yourself go to the corners of the room, and in the center are joined those that were cut off at the factory - they will give a perfectly even joint.

- Cut off the corner parts with the help of a miter box so that they fit together evenly.

- Replace the skirting boards on the floor and see how accurately they fit in place. Correct if necessary.
After completing the preparatory work, you can begin mounting directly to the wall.
Important: You need to start work from the corner opposite the entrance to the room.
Mounting
- Before sticking the plinth on the stretch ceiling, attach it to the walls without glue, check the joints.
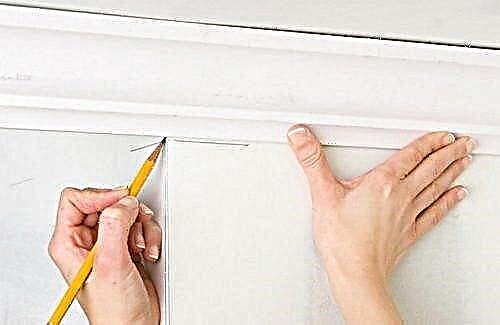
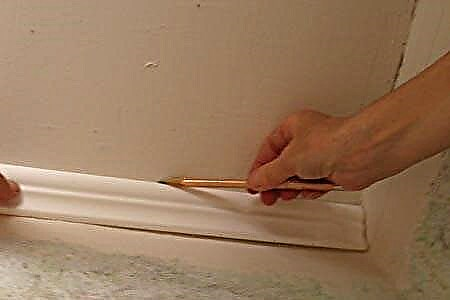
- Mark the wall with a pencil, indicating the joints and the lower edge of the ceiling baseboard.
- Use a polyethylene lining (cling film) between the ceiling and the baseboard.
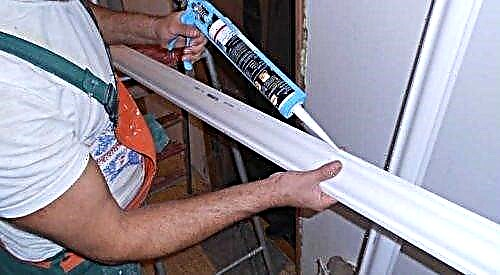
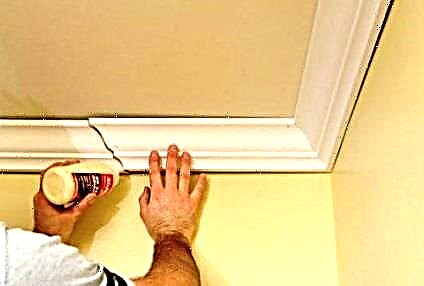
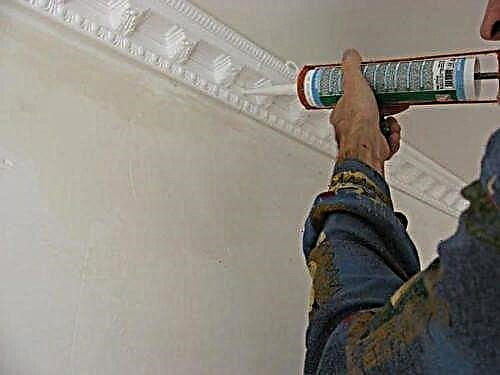
- Lubricate the wide side of the ceiling plinth with glue and wait a couple of seconds - this is necessary so that the glue begins to set.

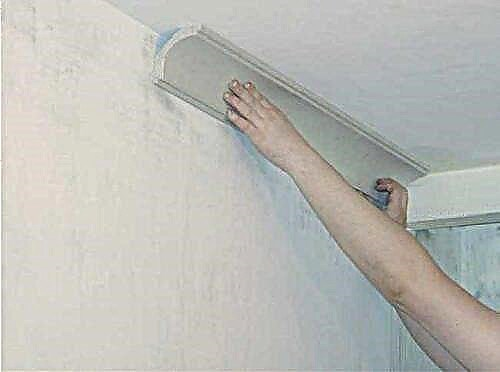
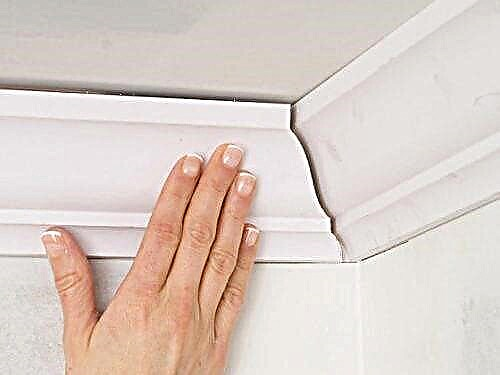
- Place the baseboard against the wall, guided by the pencil markings, and press for a minute. Then use a cloth to remove any excess adhesive that has protruded.

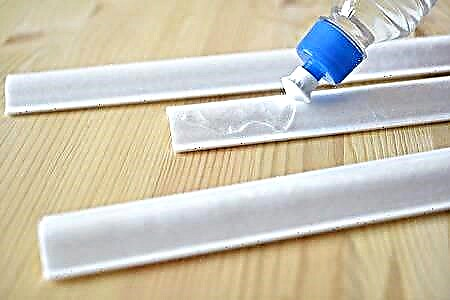
- The next baseboard is glued in the same way, it is applied to the already glued one. In addition to the wide part, it is necessary to coat the ends of the skirting boards with glue.
- Continue sticking skirting boards around the entire perimeter until the work is completed. After the glue “grabs” a little, you can remove the film from the ceiling, if you do not plan to paint the skirting boards.

Important: You can start painting the ceiling skirting boards only after the glue has completely dried. See the adhesive packaging for drying time information.
After the glue has completely dried, it is necessary to fill the gaps between the wall and the base with the help of a sealant and a spatula.
Is it possible to glue the plinth on the suspended ceiling
It is not advisable to glue fillets onto a stretch ceiling, as ceiling skirtings are also called, especially if there is no experience in these matters. This is due to several reasons:
- due to the fact that the stretch fabric is a thin synthetic film, there is a risk of mechanical or chemical damage,
- due to the mobility of the material, rigidly fixing the baseboard is not an easy task,
- due to uneven tension after drying of the adhesive composition, folds, skews often appear on the ceiling,
- due to the strong coupling of the tension web and baseboard, it is almost impossible to peel it off.
To beautifully make a skirting board on a stretch ceiling, you need to know which set of tools should be prepared and which algorithm of actions to follow. If none of the above points are frightening, then for the final finish and fastening directly to the canvas, special liquid nails will be required.
How to glue a ceiling plinth to a stretch ceiling at the end of the finish
Installation work is carried out on already glued walls or painted surfaces. The technology for laying ceiling skirting involves the following actions:
- Choose a suitable adhesive, which after drying does not change its color.

- Prepare the necessary tools (simple pencil, tape measure, cord for marking, knife, hacksaw, ruler-corner, stepladder, table).

- Attach a ceiling plinth to the surface in order to determine the correctness of its location, otherwise there is a high probability of the appearance of bevels. Mark up by marking the wall.
- Apply adhesive to the part of the fillet that will press against the wall.


When installing ceiling skirting boards, you should know that the first thing a small amount of glue is applied to the back of the fillet, avoiding the edges, can withstand a few minutes, and then only press it against the wall. To trim the skirting board for decorating corners, you must use a special device - a miter box. The principle of operation is to install the part in the tool according to external or internal trimming. To avoid element displacement, cropping should be done quickly, but smoothly.

How to glue the skirting board to the suspended ceiling is shown in the video.
Installing a ceiling skirting board on a stretch ceiling before finishing
The fillets in this case are glued to untreated clean surfaces. Plinth installation on the suspended ceiling is carried out according to the following instructions:
- Prepare glue or putty, necessary tools for work.
- Moisten the surface to improve the quality of adhesion (adhesion).
- Make a working solution based on the putty, kneading it in accordance with the manufacturer's instructions.
- Apply a small amount of solution to the back of the fillet, distributing it evenly.
- Attach the element to a specific place, align it and support until it grasps.
- Remove all excess working solution.
- Subsequent parts are mounted in the same way.
The surface on which the ceiling plinth is glued must be flat, otherwise there is a high probability of gaps between the finishing elements and the wall.
How to fix a foam ceiling plinth to a stretch ceiling
Foam products are easy to install, low weight (light) and affordable cost. But they have their drawbacks: they require careful handling and a special adhesive composition. To put the baseboard on the suspended ceiling, you must act according to the following plan:
- Draw a straight line (landmark) with a simple pencil and level. Apply adhesive to the inside of the fillet.
- Press the part against the wall.
- Seal all joints with sealant or putty.

- Paint if necessary.


For installation work it is better to choose acrylic "liquid" nails, which are distinguished by good fixation, do not corrode foam products, quickly set and are easily removed with a wet sponge. Acrylic putty is also suitable for these purposes if the walls have irregularities, as well as a self-adhesive adhesive made from one part of PVA and four parts of the putty and water.
How to stick a polyurethane baseboard on a stretch ceiling
In order to insert the skirting board into the suspended ceiling, you need to use such adhesive compositions as Titanium, Moment, liquid nails. Polyurethane skirting is distinguished by high flexibility due to the presence of rubber in its composition. With its help, you can arrange a room with various bends, broken lines.
Installation technology provides the following algorithm of actions:
- Prepare surface: clean and smooth with putty.

- Mark up on the wall with a level and a simple pencil.

- Cut the elements without pressing too hard on them so that they do not deform. At the end of the sawing, process all ends with sandpaper.
- Apply adhesive to the back of the fillet, evenly distributing it over the entire surface. To fasten the end parts, glue is also applied to them.
- Starting from the corner, stick the first element, holding it for 20-30 seconds. Subsequent parts are mounted in a similar manner.
- Fill joints with sealant and wipe with a damp sponge.

- Paint if necessary.


How to glue the baseboard to the suspended ceiling is shown in the video.
How to attach a heavy ceiling skirting to a stretch ceiling
Fillets made of polystyrene foam do not cause installation difficulties, do not lose their decorative qualities after a while, are not subject to decay and are suitable for painting. Another advantage of this finish is a complete resemblance to gypsum molding, which has a rather attractive appearance, giving the room a certain originality. To install them you need:
- Mark the surface by drawing a flat bottom line.
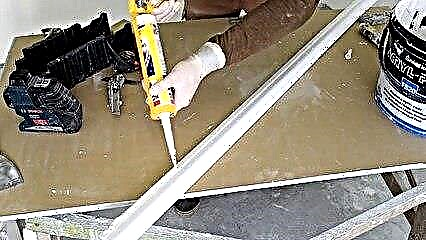
- Apply adhesive to the back of the element by using a mounting gun.

- Glue the first element, starting from the corner of the room. It is necessary to hold the baseboard for several minutes, fitting it clearly according to the marking.

- Stick the rest of the elements around the perimeter, following the same procedure.

- Seal joints with acrylic sealant.
- After drying, stain the fillet.


To achieve the desired effect, it is necessary to cut the ceiling plinth made of polystyrene foam only with a sharp knife or hacksaw.
Stretch ceiling ceiling mounting tools
For gluing fillets, you need a certain set of tools and auxiliary materials:
- miter box
- construction knife, hacksaw,
- roulette,
- ruler
- square with a right angle and an angle of 45 degrees, protractor,
- to make a markup a simple pencil,
- several types of spatulas (rubber, narrow metal),
- construction gun for applying glue to the fillets,
- a container for the preparation of a working solution based on putty,
- finishing putty,
- white acrylic sealant,
- mounting adhesive,
- water-based paint.
When all this is ready, you can begin the process.
How to glue skirting boards to a stretch ceiling: instructions
The ceiling plinth can be installed on glued walls, on a plastered surface, and on painted. If the wall has irregularities, then it should be prepared as much as possible: clean, grind with a primer, smooth it with plaster and primed again. Installation work should be done only after the soil has completely dried on the wall.
Installation instructions for skirting the suspended ceiling:
- Using a construction gun, apply adhesive to the back of the ceiling baseboard.
- For the best connection of the fillet with the wall, he needs to let him lie down for several minutes, and only then attach and press it to the intended surface. To avoid traces, it is recommended to press the element to the wall through a clean cloth.

- Excess adhesive should be removed immediately. When they dry, they cannot be removed.

- At the very end, all gaps must be treated with acrylic sealant or putty. For smoothness, the sealant can be smoothed with a finger dampened in water. For such work, rubber gloves are recommended.

- To seal the gaps at the joints, putty and a narrow spatula are used.


A video on how to insert a skirting board into a suspended ceiling is presented here.
The adhesive composition should be purchased in strict accordance with the specific type of ceiling plinth.For the design of small premises, the best solution in terms of the choice of fillets is narrow and simple models. But for finishing the stretch ceiling in spacious rooms, a wide baseboard with a complex pattern will look more effective.
If you want to highlight the stretch ceiling, you can play in contrast, where the fillets will have a completely different color in contrast to the canvas. During installation, you should know that you need to leave a gap of 3-5 mm from the stretch ceiling. In order not to spoil the appearance with excess glue, you need to immediately wipe it with a clean cloth. Insert the ceiling plinth on the suspended ceiling under the strength of everyone, most importantly, do not neglect the rules for its installation.
Conclusion
It is quite simple to glue the baseboard to the stretch ceiling with your own hands, if you follow a certain algorithm of actions. To get the maximum effect, you need to choose fillets taking into account the color of the ceiling surface and walls. It is important to achieve a spectacular combination of all elements of decorative finishes. If there is no clear solution, then, as an option, you can use a light and budget skirting board that is most suitable for color.
How to choose a skirting board
Ceiling plinth for suspended ceilings can be made on the basis of foam, plastic, polyurethane. If required, you can find products that are made of natural wood or gypsum. It’s more difficult to work with such options, because they have more weight. It is much more convenient to use polyurethane elements, they are practical and also amenable to coloring.
On a note! You should carefully approach the choice of foam products. This option can be very impractical. The fact is that a ceiling plinth made of this material can undergo drying, this will lead to the formation of wide joints between adjacent elements.
What should I look for when choosing a skirting board:
- Products can have different sizes, therefore, in order to avoid numerous joints, it is necessary to choose longer fragments. You should also think about interior design in advance. The fact is, the material can be smooth or embossed, which significantly affects the appearance.
- It is better to give preference to options that have a wider wall part. This will allow for better fixation, especially with not-so-perfect repairs.
- The product is purchased with the necessary margin. This situation is due to the fact that it is very difficult to fit the connection of all angles. If there is very little experience, it will be better to make preliminary training.
- Before gluing the skirting board on the stretch ceiling, you need to choose the right glue. It is better to give preference to universal compositions that are suitable for fixing a specific material. It is important to take into account the time of gluing, some adhesives require holding parts after installation.
 For the installation of ceiling skirting, it is best to give preference to universal adhesive compositions
 On a note! Material manufacturers do not stand still. Therefore, now there are additional items on sale - special corners. They are glued to the corners, which makes it possible to avoid complex trimming.
Methods for mounting the skirting under the suspended ceiling
How to glue the ceiling plinth to the stretch ceiling? The mounting method depends on at what point it was decided to install it. There are two main options:
- The product is glued directly after all work. The fact is that many initially clad the walls with wallpaper, stretch the ceiling canvas. Accordingly, skirting boards are fixed last. This state of affairs is most common.
- Fasteners are made after the ceiling is installed. This precedes the work with the walls. There is one small minus. It must be borne in mind that it becomes very difficult to carry out preparatory work on the walls. Firstly, you can easily damage the canvas. Secondly, the stretch ceiling repeats the configuration of the walls, which means that all the bumps will become even more visible.
 Most often, the installation of a ceiling plinth is done after finishing work with walls and a ceiling, although this is not always justified
Therefore, depending on the situation, the necessary technology is selected.
Finishing
Plinth installation on glued or painted walls occurs according to the following principle:
- For work, a reliable adhesive composition is selected. The best option is transparent or white material. It is important to consider that the substance should not change its color after drying or over time. The setting time is also taken into account, the longer it is, the longer it will take to hold the part.
- The necessary tools are being prepared. For this event you will need: a simple plastic miter box, a good stationery knife, a saw, a meter, rags. It should be borne in mind that the work will be performed at a height, so it is necessary to provide a reliable stand or stepladder.
- Skirting boards begin to stick from the selected angle. This is the same as gluing baguettes.
On a note! Previously, you should practice trimming fragments at the desired angle. For this procedure, a miter box is used. This tool has special cutouts located at an angle. Each part is placed so that an external or internal angle is obtained. Trimming should be smooth and fast to prevent the element from shifting.
If the walls do not have perfect evenness, this will lead to the formation of cracks between the baseboard and the wall. To eliminate them, apply masking tape. It is glued to the part and to the wall. That is, the existing defect is eliminated. After complete drying - the tape is removed.
On a note! It should be borne in mind that correction by means of adhesive tape can lead to the appearance of a bend of the element. Sometimes it happens that the curvature is so big that it spoils the whole appearance. Therefore, there is another way, which consists in the fact that the gap is sealed with sealant or putty. Subsequently, everything is covered with paint.
Thus, the whole area is glued. It should be understood that when removing wallpaper, in this case, damage to decorative elements is possible.
Skirting Choice
The most popular material for moldings are polymers. MDF, wood or gypsum can not be used - skirting boards are too heavy, their installation is complicated and requires additional fixation.
It is best for suspended ceiling baguettes made of polystyrene foam (polystyrene).
Foam
They can have a flat or embossed surface, the pattern of which most often imitates stucco molding. A white baguette goes on sale, but after sticking it can be painted in any color. Foam skirtings are easy to fix, and if accidentally peeled off due to their light weight, they will not harm anyone, even if they fall on their heads. Due to the low ability to absorb moisture and steam, they are glued in bathrooms.
Serve from 15 to 20 years. During operation, it is allowed to clean with a vacuum cleaner or liquid detergents. They cost from 13 to 20 p. a piece.

Skirting boards are very brittle, do not bend, and form an unreliable grip on a curved wall. Unstable to solvent and materials based on them. It cannot be placed near lighting, since the material has low heat resistance, and when burning begins to release styrene. Under the influence of sunlight, the foam baseboard begins to turn yellow.
Polyurethane
Stronger than foam. It is made from polymers containing no toxic styrene. They are even, with patterns or relief. Visually, the models for stucco work resemble gypsum, but they cost less. The skirting board is resistant to mechanical stress, easy to clean and dye with acrylic-based dyes.
Polyurethane bends easily, so it can be used to form curved structures and design uneven surfaces. They are decorated with columns, bay windows. Polyurethane baguette reliable, durable, resistant to temperature extremes. It does not absorb the smell, so it is ideal for the kitchen. Due to the dense structure of the material, it is easy to care for.
- are 2 times more expensive than foam,
- they have a lot of weight, so they need to be “planted” on special glue, and large structures should be additionally fixed with screws,
- due to the high rigidity, a face saw is used for cutting,
- high consumption of glue.
Plastic
They have a design feature in the form of a mortise lock. Designed for stretch ceiling, fastened with harpoon method. During installation, glue is not used, since the molding is easy to insert into the recess of the profile. For the design of corners, additional elements are used, therefore, it is not necessary to file material for its joining.
The advantages include quick installation:
- no glue needed, parts are fixed with latches,
- no painting and plastering of gaps required.
The downside is that it is available only in white variation, requires prior alignment of the walls and is suitable only for harpoon mounting systems.
What to glue
- Liquid Nails. Often used universal adhesive Moment or composition for polystyrene foam - Installation Express Decor. It has a white color, is resistant to moisture, harmless, does not destroy the texture of the foam. It is applied with a dispenser gun.
- Adhesive based on polymers (Econ-nast, Master, Elitas). It has a water base. It is inexpensive. Dries longer. Due to the need to press the baseboard against the wall for 5-10 s, the installation time is extended.
- PVA. A safe compound that can be easily removed with water. Dry for at least 3 minutes.
- Acrylic putty (Uniprof, Master Teks HM). Solvent-free, based on acrylic dispersion, moisture resistant. Any decorative parts made of polystyrene and polyurethane are glued. It dries quickly.
It can be glued with a home-made compound made of PVA and finishing putty, connected in a 1: 4 ratio. Water is gradually added to the mixture until a consistency of batter is obtained. After obtaining a homogeneous composition, it settles for 10 minutes, mixes and applies. Homemade glue is being prepared immediately before installation, gluing the baguette should be done in 1.5-2 hours.
Tools and materials
- Stepladder, scaffolding or stable chair,
- roulette,
- pencil,
- stationery knife,
- miter box for cutting baguette in the corners,
- small metal spatula or gun (for liquid nails),
- a thin blade of rubber or plastic, which will remove excess glue and putty the joints of the elements,
- medium hard brush for painting.
Of the materials you will need glue, putty or sealant, which will close the cracks and eliminate joints before painting, a plastic film to protect the ceiling from glue splashes, as well as wipes to remove them.
Skirting calculation
First, the length and width of the room are measured. Its perimeter is calculated by the formula P = 2 * (a + b). 15-20 cm is added to the sum received for each corner. The finished figure is divided by the standard size of the baguette, usually its length is 2 m. The result is rounded up. Bought 1-2 baguettes more in case of marriage or spoilage. With a non-standard shape of the room, its configuration is divided into separate sections, from which the desired number of skirting boards is finally calculated.
Calculation for a room of a rectangular shape measuring 8x5 m with 4 corners:
- perimeter: 2 * (8 + 5) = 26 m,
- taking into account angles: 4 * 0.15 = 0.6 m,
- total length: 26 + 0.6 = 26.6 m,
- number of stripes: 26.6: 2 = 13.3 pcs.
The resulting number is rounded to 14 pcs., And taking into account possible marriage, you need to buy 15-16 pcs.
Wall preparation
- They are cleaned of the old finish, treated with a primer to increase adhesion. Instead of purchased primers, you can use a solution of latex and water in a ratio of 5 to 1.
- After the soil has dried, they begin to work.
It is better to glue the wallpaper after installing the baseboard, then during the next cosmetic repair there will be no need to dismantle it. This method of sticking will be more reliable.
If the walls are already finished with wallpaper, only a lightweight foam molding is selected. At the same time, work with glue is carried out very carefully so as not to stain the finish. Appeared excess messi cleaned with a napkin.
If the baseboard will be repainted in a different color, it is best to apply the first coat of dye before installation.
Markup
- The fillet is firmly pressed against the wall so that its upper edge abuts against the ceiling.
- Pencil marks the bottom border of the baseboard in each corner of the room. For marking, a small segment of the plinth is used with a length of not more than 0.2 m.
- Marks made are connected with a painting cord, a line is drawn along the perimeter of the room.
Bonding baseboards
- Sticking starts from the corner of the room.
- On the wide side of the baseboard, an adhesive is applied in a uniform layer.
- The baguette must be attached at the bottom mark, evenly pressing it to the wall along the entire length. The initial hitching time depends on the type of adhesive (indicated on the packaging).
- Excess glue is removed with a spatula or cloth.
- On the next baguette, glue is applied to the main and side surfaces.
- The baseboard is mounted around the perimeter.
Docking in the corners
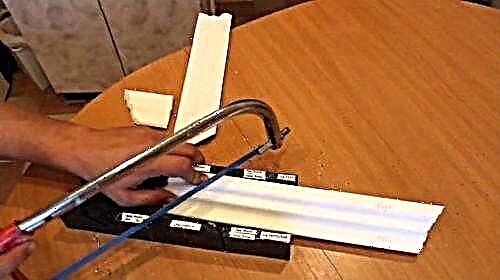
At the corners, the fillets are joined at an angle of 45 °. To form an even joint, a miter box is used. Baguettes can be cut with a knife or saw. With a knife, the cut turns out to be of better quality, the border is not painted, no burrs appear.
The skirting board is laid down in the miter box with the side that will be adjacent to the suspended ceiling. The knife is inserted into the inclined slots of the sides. During the joining of the cut parts, glue is applied to the cut of one of them. You can buy ready-made corner parts, but it is quite difficult to select them in size and texture.

Sealing cracks
The joints and gaps between the baguette and the wall are masked by sealant. Slots are sealed with putty during gluing. After complete drying, you can start grouting and painting the skirting boards.
To reduce the gaps between the ceiling and the fillet, it is slightly pressed up during installation. The baseboard must be held until it is fully fixed to prevent slipping.
Two-level ceiling mount
The baseboard is attached in the same way as to a single-tier ceiling - on the wall. The technological seam between the tiers is masked by decorative PVC inserts in the form of tubes, fungi or ovals.
To hide the transition between the levels of a curved shape, it is better to use flexible plugs. Masking tape is pushed into the joint with a wooden or plastic spatula.
For decoration, a twisted cord can be used as a stub. It is fixed with glue and allows you to mask the transition between tiers, the joints between the ceiling and the wall.
Necessary tools
To perform the self-assembly of these elements on a stretch ceiling, you need to have the following tools:
- liquid nail gun
- pencil,
- miter box
- knife,
- putty knife,
- roulette,
- stepladder
- a rag to remove excess glue,
- a film to protect the canvas, so as not to stain it with glue.

Choose glue
The glue used for mounting fillets should be transparent or white and should not darken over time.
Apply such means as:
- liquid nails (acrylic, neopropylene)
- polymer glue ("Titan", "Eco-naset", "Moment")
- acrylic putty

For foam skirting boards
To stick foam baseboards use:
- acrylic “liquid nails” - securely hold, do not corrode polystyrene, quickly set, excesses are easily removed with a wet rag,
- acrylic putty used for curved walls, to save liquid nails,
- homemade adhesive (one part PVA + 4 parts of putty finishing + water).
How to trim angles?
During the installation of straight sections of the baseboard, usually no problems arise, but you will have to tinker a bit with the corners. The difficulty is not in gluing the corners themselves, but in the correct cutting of fillets. 
There are two options: You can trim the elements yourself, or you can buy ready-made corner strips. To cut the corner element correctly, you can use a miter box at 90 degrees.
The cut is done at an angle of 45 degrees, while keeping in mind that one baseboard must be right-handed and the other left-handed.
Attention! The miter box is suitable for ideal walls, with an angle of 90 degrees. At a different angle, the skirting boards require subsequent trimming at the installation site.
Expert Advice
To correctly install the ceiling skirting on a stretch ceiling, you must adhere to the following rules:
- The baseboard must be secured using a polyethylene lining between the stretch ceiling and the narrow side of the baseboard. After installation, the gasket is removed.
- corner elements are cut at an angle of 45 degrees,
- gap between fillet and wall necessarily close up with acrylic putty,
- gluing polyurethane elements to the wallpaper is not recommended, as they are heavy, and the wallpaper may not support their weight,
- wooden skirting board does not stick, and is fastened with the help of special elements, therefore it is always held securely.
Output
In order for the view from the stretch ceiling to be beautiful and complete, it is necessary to choose and install the ceiling plinth to it correctly.
Installation of fillets is easy to do with your own hands, special attention must be paid to the correct cutting of corner elements, and then gluing you will get a high-quality and beautiful.