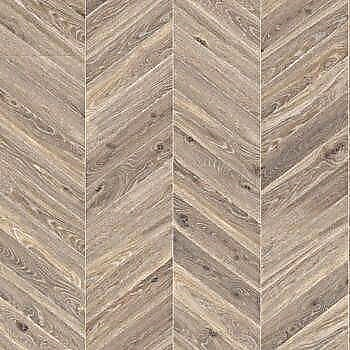
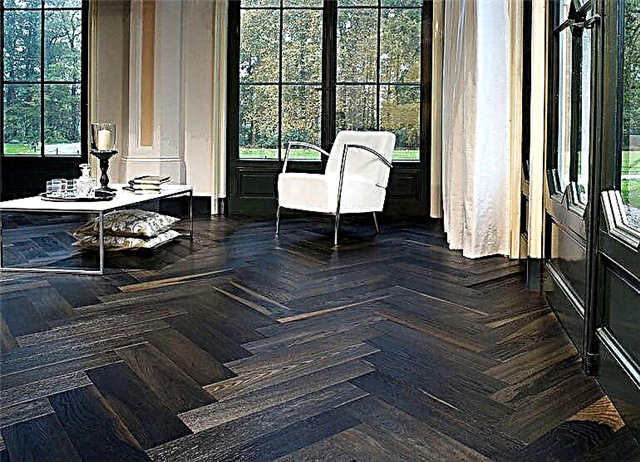
Trend 2019 in laminate fashion - a Christmas tree pattern. Fresh, unusual, but at the same time - a classic, and the space expands and looks rich, fits any interior.
Many manufacturers have already released new items in this style, as there are a lot of requests from designers and buyers, and there was nothing special to offer except for typeset parquet and massive board, and this does not suit everyone.
It will not work to put an ordinary standard laminate “herringbone”, because the laminate locks on the long and short sides differ in shape and cannot snap into each other.
Belgian brand Berry Alloc offers new 2019 laminate flooring CHATEAU , which is going to at least somehow, the locks of the short side snap into the long side. You can collect not only a classic Christmas tree, but also almost any pattern at the request of the buyer. The price tag for the laminate is very adequate for a real, very high-quality Belgian product.
The collection has 8 colors, from white
Only 7 matte options +1 chic gloss, which everyone falls for immediately, because it is very beautiful and vibrant.
The small size of the board, equal to 504 mm * 84 mm and a 4-sided chamfer, give a great resemblance to a massive board. But the presence of locks for quick and easy styling, unlike massaging, gives a huge advantage. We don’t know how it is with you, but in Krasnoyarsk we have masters who can lay down a massive board well, units.
All designs are brushed to give an additional natural effect. Even gloss, a little "brush"
If you had the experience of laying the laminate "herringbone", we will be very grateful if you share in the comments . If you have read, it means we worked not in vain - support us like and subscribe tochannel "Laminat-t-t Linoleum-mm" !
What kind of Christmas tree?
This type of installation provides for laying the board at an angle to each other. Moreover, there are several installation options in this way:

- "French Christmas tree" is the most popular pattern, which is used in rooms with a European interior and visually gives volume to the floor. The board is placed at an angle of 30 0 -40 0 with exposure to regular and clear lines, thereby forming a certain step pattern,
- “Hungarian herringbone” - is distinguished by giving brightness and more dynamism to the coating in the final result, and its installation is made at an angle of 90 0.
Styling options
The installation method is chosen prior to purchasing the laminate to determine the exact number of panels that will be required to form the floor covering. The size of the boards, their design and texture affect the choice of a particular installation option. Modern materials allow laying:
Attention! The latter sometimes has to be abandoned, since not everyonelaminateLooks impressive when layingherringbone.
Direct styling
In most modern apartments, the rooms provide only one window. In this case, it is recommended to perform direct laying of the laminate, placing the seam along the direction of sunlight. This is the right solution for an extended room. For direct laying of the panels, I place them parallel to the walls.
 The arrangement of straight rows along the light flux
Advice! If you want to spend a minimum on the purchase of laminate flooring, choose direct laying. In this case, no more than 5-7% of the total number of boards goes into waste.
Cross laying is resorted to if the width of the room is relatively small. Cross-laying helps to expand the boundaries of the room, add internal volume. True, in this case, the joints become noticeable, which may affect the presentability of the flooring.
 The arrangement of straight rows across the light flux
Diagonal styling
This is a time-consuming method, involving a large consumption of laminate. About 17% of the total number of purchased panels is wasted. Laying the laminate is performed at an angle of forty-five degrees. As a result, it is possible to form a beautiful floor covering.
Laying a laminate in a diagonal way begins in different ways. The first option assumes that the process goes from the corner of the room. In the second method, the laminate is laid from the middle of the room in the direction of the walls. Which method is more convenient in each case is decided individually. Professionals actively use both options.
 Diagonal mounting from angle
Attention! If you want to reduce the amount of waste, pay attention to the second option. When laying from the middle, material is saved and the installation time is reduced.
The advantage of diagonal styling is the ability to visually expand the space. They resort to this option if it is not planned to lay carpets on the floor and install a large amount of furniture. Otherwise, at high costs for the performance of work, there will be no effect from the diagonal laying method.
Herringbone
If you decide to purchase standard boards, then this method is not even worth considering. Herringbone installation involves equipping the panels with special locks. Manufacturers offer collections in which the laminate is presented in the form of small boards that allow joining at right angles.
 Christmas tree looks beautiful
Among them, Quick Step Noblesse stands out, suggesting laying either along or against the line of natural light. The first option creates the illusion of a holistic floor covering. The second - visually expands the boundaries of a small room. True, in this case, the junction of two adjacent boards will be noticeable.
Attention! When laying with a herringbone, the laminate consumption significantly increases, which affects the cost of work.
If you do not want to overpay for excess material, it is worth considering the possibility of laying a laminate with a suitable pattern. The collection “French tree” allows you to effectively simulate the eponymous version of styling. Laminate panels are given a characteristic angle pattern.
 "French tree" - a unique design
This picture was proposed only a couple of years ago by Austrian designers, but today it is already popular in many countries. The surface of the laminate of this collection is characterized by a special embossing. Designers added natural “dents” and “scratches” to add a maximum of authenticity and naturalness to the laid flooring.
Laminate is designed for domestic use and has excellent performance. Subject to the manufacturer's recommendations, the floor covering will retain its presentable appearance and properties for 30 years. The thickness of the panels is 8 mm.
Training
Installation begins with a thorough leveling of the base. Depending on the grade of laminate purchased, the deviation from flatness can reach 2 mm per meter of surface. To control flatness, a building level is used, the length of which is at least 1 meter. It is applied in several places at different angles to make sure that the prepared base meets the requirements established by the manufacturer.
Attention! When monitoring flatness, it is important to identify concave and convex places.
After making sure that there are differences on the concrete surface, proceed to the device of the screed from a special self-leveling mixture. If the floor is wooden, the leveling of the base is carried out using sheets of plywood (OSB, chipboard) of a suitable size. When buying sheets, it is recommended to give preference to a material with a sufficient level of moisture resistance.
A large number of bumps affects the life of the floor. In this case, there is a risk of gaps between the stacked boards. When used in connection points located above a convex or concave place, the boards are displaced relative to each other. This leads to the fact that the castle connection is gradually losing its characteristics. The reason for the premature appearance of a gap at the junction of the panels may be the initially low quality of the laminate.
Backing
The thickness of the substrate should not exceed 4 mm. The use of thick material will also reduce the resistance of locks to external influences. Manufacturers offer substrates with different characteristics, service life and cost. The most affordable option is products made of polyethylene (Isolon, Penofol and others).
An more expensive extruded polystyrene foam option is also used. Such a substrate is a rectangular sheets, one side of which is made corrugated. If you want to give preference to an environmentally friendly base, you should pay attention to cork substrates. This is also the most expensive option of all available.
The list of materials that are used to make the substrate for the laminate is constantly expanding. Manufacturers offer all new options, characterized by a long service life. It is guaranteed that the service life of the substrate will exceed the service life of the laminate. When choosing in most cases, you can simply focus on the total cost of the substrate.
If you plan to install on a concrete base, take care of the presence of a waterproofing layer. To do this, you can purchase ordinary polyethylene, the thickness of which is within 0.2 mm.
Laying laminate flooring
Before proceeding with the installation, the material is given time to adapt to the operating temperature (at least two days). After that, you can proceed with installation in the selected way. At the same time, the boards themselves can be connected in different ways.
Installation of the laminate begins from the corner. In most cases, preference is given to the left. Before starting work, carefully measure the parameters of the room in order to calculate the size of the last row. This is a mandatory action - if between the laid coating and the wall remains about 2-3 cm to decorate their baseboard will be very difficult. At the same time, cutting such a strip from the board is also difficult.
When planning the cutting of material, try to make sure that the width of the last board is not less than 5 cm. This can be achieved by cutting off part of the material from the first stacked board. Provide a 1 cm gap between the laminate and the wall in advance. This distance compensates for changes in board size due to thermal expansion that may occur during the off-season. Decorate the technological gap with the help of a plinth.
Glue
The connection option by means of an adhesive composition has one indisputable advantage. In this case, it is possible to ensure the formation of tight joints, which eliminates the likelihood of moisture entering between the boards. This is best reflected in the duration of the flooring. True, this option is the most costly and time-consuming from a financial point of view. It is necessary to acquire a sufficient amount of adhesive composition.
Attention! If you plan to install a warm floor, the adhesive method of the laminate should be abandoned.
During installation by this method, it is purchased in a specialized store and an adhesive composition with moisture protective properties is prepared. The use of water-based products, which include PVA, in this case is unacceptable. The moisture contained in the adhesive will certainly penetrate into the panel, which will cause the laminate to swell and, as a result, shorten the life of the floor covering.
Installation using this method of connecting panels is performed in the following sequence:
- Glue gently lubricate the groove of the bar, evenly distributing the composition on the surface,
- Dock the panels, leading the spike into the groove. To ensure a solid connection and reliable joining of two adjacent boards, they resort to lightly tapping on a wooden block attached to the extreme board,
- Using a cloth to remove excess glue that has appeared on the surface.
Attention! Installation is carried out with interruptions, which are planned every three rows laid. During the break, the glue should dry. This will provide a strong grip between the boards. Operation of the flooring is possible no earlier than after 10-12 hours.
The need to use the adhesive composition, the large time and complexity of the installation makes many abandon the adhesive method. In addition, if one board is damaged, it will not be possible to replace it. Disassembly of the flooring and laying of a new one will be required.
Many manufacturers have excluded laminate from their catalogs, allowing adhesive bonding of panels. He was replaced by modern models. They allow multiple assembly and disassembly of stacked panels and simplify the installation process.
Castle connection
The laminate offered by manufacturers can have various types of lock joints, which are conditionally divided into Lock and Click. In the first case, the panels are driven into each other with a hammer. Thanks to special combs, it is possible to securely fix the spike in the groove without the use of an adhesive.
 Lock system
Click locks are provided on more modern laminate models. This option is considered practical and durable. During installation, the panels are inserted into each other at an angle of 30 to 45 degrees, and then pressed to the floor surface. At this moment, the lock clicks into place, and the panels are firmly interconnected.
Before you get the right amount of laminate, it is recommended to determine the method of installation. Depending on the option chosen, a different number of slats may be required. The laying method is influenced by the pattern and structure of the laminate, the direction of the light flux.
Features
Not every laminate can be laid in such a way that the coating has a “Christmas tree” pattern, since not every manufacturer produces models that suggest this way of laying. When choosing a laminate for laying "Christmas tree" it is important to pay attention to the method of fastening. The main feature of a suitable type of coating is that the locks are on all four sides, not on two. This is due to the fact that this way the laminate becomes more versatile, and it can be turned over and combined to create the perfect ornament.

All laminated boards should have the same size and coating so that the pattern looks harmonious. Another feature of laying the floor with a laminate in the form of a “Christmas tree” is that before that it is important to carefully plan this process. Keep in mind that, since you have to join the pattern, subsequently it will still be necessary to trim the laminate. On average, about 17% of the total area of the coating is lost on the trim, so for laying this laminate it must be purchased with a margin.

The cut off particles of the boards cannot be used, since it will be impossible to dock them, and they will have to be disposed of.
Types of Laminate
The first type of laminate with a herringbone pattern was a coating that assumed only one and only laying technology. Thus, all lamellas could be placed in only one connecting direction, that is, no change in the herringbone pattern, step width, and design of the entire coating was supposed — it had a standard appearance.

But now manufacturers offer a large number of types of such a laminate with different castle joints. So, acquiring a separate functional element for fastening this laminate, it will be possible to lay it at your discretion, using a different mesh pitch.

There is a laminate for laying several types of herringbone.
- A. This model has locks fastening adjacent lamellas only on two longitudinal sides of the lamella, that is, they can only be joined parallel to each other.
- B. Models have a lock connection on two opposite short sides, that is how they can be joined to each other.
- C. These are the most versatile four-sided lamellas, which allow you to give free rein to imagination and lay out the drawing at your discretion, showing ingenuity.
Models are also divided into types depending on their size and other external characteristics. You can choose a thin laminate with a width of 150 mm or wide panels under the "Christmas tree" with a thickness of 330 mm. The latter option is easier to style and match. The average width is 190 mm. Different manufacturers offer interesting models, combining the design, size and type of lamella fastening. So, you can find standard lamellas of medium length with locking joints along the longitudinal side. They suggest manual styling and self-docking.

Other manufacturers offer medium-wide models: you can turn the lamellas and connect them with a "herringbone". More versatile and comfortable are wide lamellas, which most often have a square shape. They differ in large width and size. So, the Christmas tree pattern is already imitated on them, and it remains only to fasten the panels together, without violating the order and step. This option is the most popular and often bought, it can be stacked independently, without outside help.

In addition, as a result of its layout, a minimal amount of waste is generated.
How to make herringbone styling?
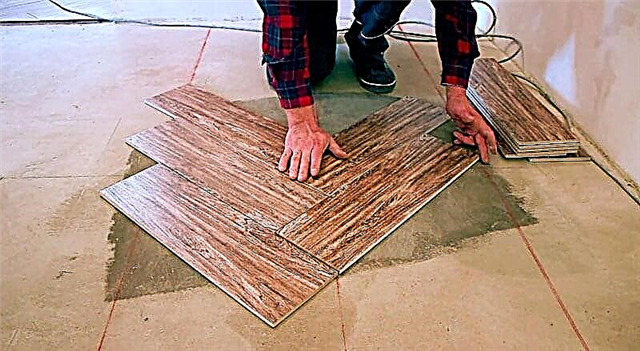
In order to make a “Christmas tree” pattern on the laminate flooring, it is necessary to correctly place all the elements. So, near each wall of the room in which the installation is planned, it is necessary to leave a distance of about 10 mm in reserve. If the area of the room is too large, then this distance is better to increase to 15 mm. Laying in this case does not begin across the room, but in length, that is, starting from the top edge of a longer wall. It is necessary to outline the start line of the flooring. On it you need to properly lay the edges of the lamellas so that they lie in one conditional line "herringbone". In no case should the coating extend beyond these lines.

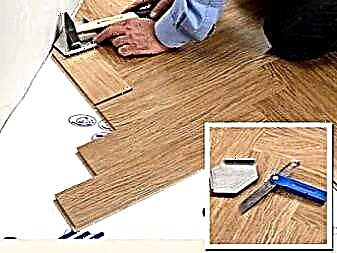
When laying the coating in this style, it is imperative to comply with the requirements for placing the lamellas at an angle of 90 degrees to each other. If there are doubts about the correctness of the work, it is better to make additional measurements and draw the lines of each row. When laying herringbone lamellas, it is important that all boards have the same design and uniform structure. In addition, they must have the same temperature. If part of the lamellas was stored on the street or in the yard, and part in a warm room, then it is better to bring all the details of the coating into the house and leave them for acclimatization for 36 hours. Only then can you begin to lay the tree.


Such actions must be performed so that the coating does not deform, and the pattern does not subsequently go astray.
About how to lay a laminate "herringbone", see the next video.
When laying, it is important to consider the location of the castle zones. The step, location and direction of the "Christmas tree" will depend on this. Be sure to check from time to time whether the drawing is shifted to the side, if it is not “going away” obliquely, and every three tiers, check the accuracy of measurements and the accuracy of the location. Laying should begin necessarily along the wall from its beginning, and not from the middle of the room, otherwise there is a risk of losing a large number of slats.

The previously left gap is subsequently hidden by a special plinth, in addition, the plinth is able to give the interior of the room a complete look. When mounting the skirting board, only one side adjacent to the wall must be secured. Thus, the "freedom" of the coating is ensured and possible further deformation of the laminate is prevented.

Examples and options in the interior
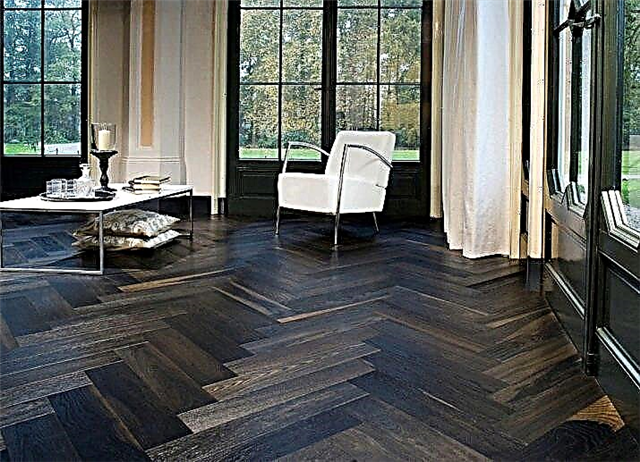
Herringbone coating is a versatile and interesting option. So, both the French “Christmas tree” and the Hungarian one look great in the interior. Laying herringbone laminate may have an unusual design - some prefer finishing the corners of the room in this way. A similar move in the interior looks fresh, allows you to place accents.
In addition, in modern studio apartments, the herringbone laminate is often used for zoning rooms. Different functional areas can be distinguished by changing the laying direction and color of the laminate or by leaving the herringbone pattern the same. In addition to the fact that this laminate allows you to transform the room, it also fits perfectly and succinctly due to its versatility.


It can be put in any room, regardless of the design of its interior.
This cover will look great in a room furnished in style country. For its design, models that most accurately convey the wood coating: laminate with bevel, embossed, are most often purchased. Such a floor should resemble natural boards, and in this case both darker and lighter options and even combinations thereof are used. Thus, you can create a colorful natural wooden floor that will look exquisite. It is usually complemented by wooden furniture and a fireplace in the living room.

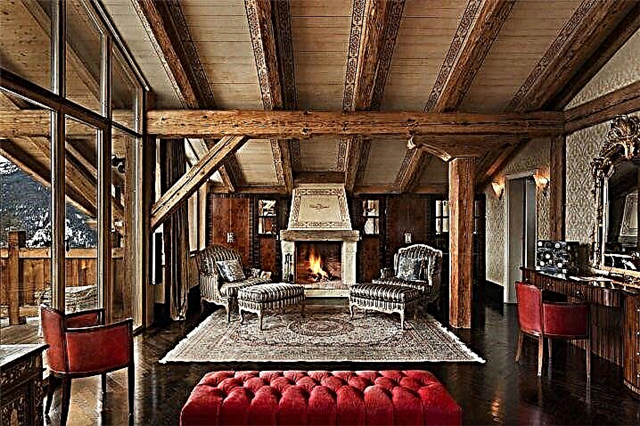
Now some are decorating the rooms in the unusual direction of Swiss chalet. It is a rustic style, which involves a combination of natural stone and wood, so in this case the walls can be made with a decorative stone coating, doorways can be distinguished in the same way, and the floor and ceiling can be finished with natural wood coatings. It is a laminate laid out with a herringbone that will perfectly complement and complete such an interior design. As a rule, for this, products in the most natural wood shades, for example, walnut or ash, are used.
Laminate for this interior is usually purchased in darker and more seasoned tones.
Nowadays, laying herringbone laminate in rooms decorated in the style is also popular. provence. An important difference between the flooring will be that it often has an “aged” texture with artificial scuffs and a vintage look, and the laminate in this case is acquired in light, pastel colors. For such styling, a coating of uneven color with a splash of gray, beige, pale gray-brown is suitable. The bleached oak color models perfectly fit in this style direction. They perfectly complement the light elegant interior in the style of Provence.


Laying "Christmas tree" is used when decorating rooms in Japanese style, but in this case they acquire models that imitate bamboo. The choice of color here is not the point. First of all, attention is paid to the texture. It should be as natural as possible, similar to natural bamboo.

In the most modern style high tech it is also possible to apply the herringbone technique of laying the laminate, but it is better if the lamellas are rather large, and the stepping grid will also differ in its large size. To maintain this style, a laminate of black, gray or white colors is acquired.

"Herringbone" put floors and in rooms in gothic style, and here they use only a dark, almost black laminate. The difference is that a suitable coating should have a volumetric texture and glossy gloss, which look very stylish and interesting.

In the interior of the nursery, “herringbone” styling is also often used, and in this case, such a pattern, made on the laminate floor, is used for zoning. Choosing models with different colors and changing the direction of the "Christmas tree", they share the play, bedroom and study areas in the child’s room. For the nursery, a drawing of lamellas, which have a dark design and a light bevel, is perfect. This contrast looks bright, allows you to emphasize the ornament.


The herringbone layout in the interior is often used to make the room visually longer. This tactical move is popular, which is why the laminate is laid on a longer wall, thus “stretching” the space. The Christmas tree doesn’t look very good in narrow rooms, for example, in the corridor or in the hallway, which is why it is better to lay the laminate in this way in living rooms, kitchens, bedrooms or children’s rooms.
A bit of general information
Laminate is a board made of MDF, on which several layers of various materials are applied by laminating:
- adhesive composition
- a thin layer of resin (melamine) or paper on which the drawing is applied by various methods. This is usually an imitation of wood or natural materials,
- a strong protective film, the task of which is not only to prevent the appearance of scratches and potholes on the artistic layer, but also to protect it from the effects of ultraviolet radiation, chemistry, and dirt.
Various additional coatings are allowed. For example, to create a laminate for a lacquered wood, the surface is treated for a special shine, varieties with improved indicators of wear resistance often have another zone of protection of increased strength.
The bottom of the laminate is waxed to protect against moisture. Today, such a board structure is adopted by the de facto minimum standard. Some manufacturers resort to applying additional layers, but such material is considered an exception to the rule.
How does a board fit
At the beginning of the development of technology, the laminate was laid under the board, including with the use of polymer adhesives. Installation included smearing of the joint zone, when connected to the next board - adhesion occurred in the contact zone and the coating became almost monolithic. The main disadvantage of this technology was the inability to disassemble the floor and reassemble it. Therefore, today a laminate under the glue - almost never occurs.
A modern board offers a locking system. Instead of glue, to prevent water from entering the structure of the material, the sides are waxed. The floor is easy to assemble and, if necessary, dismantled. At the same time, the laminate for the castle connection allows the joining process to be performed a large number of times.
When laying, one requirement must be strictly observed. The surface of the base must be carefully prepared. If this is not done, the laminate under your feet will begin to creak over time, a gradual destruction of the castle joints is possible, which will cause water to enter and warp. To avoid trouble, the height difference per square meter of the base for laying - should not exceed 2 mm
If we consider a standard laminate underfoot, it can be noted - the castle zones on the boards are located along the laying elements. This is the basis of technology, which provides only one layout scheme - deck. Boards are located along each other.
The answer to the question of how to lay a laminate with a parquet fir-tree is simple: no way, if we are talking about a standard type of board. In order to get an interesting design and style, special materials will be required. Fir-tree laying of laminate involves the use of products from a limited list of companies.
Pioneer Standard
The first company to offer herringbone laminate on the market was Kaindl, Austria. Initially, one laying technology was proposed. Laminate could be placed in only one connecting direction, without the possibility of changing the pattern and varying the grid pitch.
Today, Kaindl offers several lock options in its products. Buying the right amount of certain elements, you can lay the laminate under your feet as beautifully as your personal aesthetic needs require. Distinguish:
- type A, in which the castle connection is on the long sides of the boards,
- type B, it has docking zones - the short side,
- Type C is universal, expensive, has castle joints on all sides, and allows you to build an arbitrarily complex pattern.
It is worth noting that Kaindl products belong to the elite class. This is the so-called laminate for parquet, it precisely normalizes the dimensions of the laying elements to imitate the aristocratic floor. There is both a thin board and a fairly standard one in 195, as well as wide panels of 330 mm. The assortment of products includes various imitations of wood, styling, varnish coatings, and stylistics.
What can I buy in the market
Today in the mass market you can find a good set, the laminate under the parquet tree is produced by many companies in different formats. Meet:
- classic cropped boards for manual styling, with locking zones on both sides,
- elements of standard width, on which the figure shows several parallel parquet planks,
- wide, almost square panels where styling is visually simulated.
The last version of the Christmas tree laminate is popular with the consumer. It is easy to lay, it is easy to calculate the right amount of material for the flooring.
How is herringbone styling done
To get a uniform and accurate pattern, laying the laminate with a parquet tree should be carried out with a clear control over the placement of elements. It follows:
- to provide a compensation gap of 1 cm around the entire perimeter of the room along the walls,
- in large rooms, the gap is increased to one and a half centimeters,
- Start laying strictly along the longest wall.
The beginning line of the flooring and the control following the edges of the coating - should be carefully marked. An angle of 90 degrees is mandatory, for accuracy it is recommended to take measurements where the legs of an imaginary right-angled triangle will have a maximum length.
 Correct marking
When laying a laminate with a parquet tree, the difference in temperature of the material and the environment plays. Before laying the floor, you need to withstand the board or panels in the room until fully adapted to the microclimate. This will minimize possible deformations that can disrupt the styling pattern.
For the flooring of the laminate with a parquet herringbone, there are recommendations for the indoor microclimate. Work should be at room, stable temperature of 18-24 degrees Celsius. The relative humidity should not exceed 70%. It is advisable to maintain this regime for several days. All this time, the laminate for laying should be in the room, in printed form for temperature adaptation.
The installation process of the coating is almost standard. The elements are connected by the herringbone in accordance with the location of the castle zones, according to the manufacturer's instructions. In the course of work, it is necessary to carefully monitor the process.
 Proper installation
Check whether the edge of the laying is shifted to the side should be every three rows of flooring elements. This is done according to the control clearance around the perimeter of the room, as well as along the previously outlined line, if it is available in the area where laminate boards are placed.
For laying a parquet tree, any classes of substrates can be used. The main thing is to pay attention to the issue of temperature adaptation of the material and strict control of the quality of laying.And then it will be possible to boast a beautiful, exclusive interior of the room where the laminate is laid very unusual - an aristocratic parquet tree.
Pros and cons of laying herringbone
As with other installation methods, herringbone styling has its positive and negative aspects. Among the advantages:

- a unique, beautiful and modern version of the flooring,
- a large selection of patterns that can be combined at the discretion of the owners of the room,
- imitation under a natural parquet which gives nobility to the room.
Well, and where without cons? They, as in any installation method, are also available:
- for such installation, only special laminate collections can be used,
- the laminate itself, as well as installation work, are superior in value to their “brothers”,
- a large number of scraps, and as a result, the consumption of materials increases.
Difficulties of laying herringbone laminate
Although the installation of flooring with a laminate and even a herringbone is not such a difficult task, it is necessary to follow the advice of specialists in order to avoid as few mistakes as possible when laying independently.

The first step is to determine the material, calculate its quantity and purchase.
It is very important to remember that in the case of “herringbone” laying, it is necessary to purchase 15% more material than during conventional installation.
This type of installation provides a special type of laminate board - the locks on it should be located at the ends.
And given the fact that such installation is not so common, it still needs to be looked for.
There is a special marking of plates for such installation - A, B and C, where in option A the connecting locks are located on the long edge, B on the short edge, and C on all edges of the plate.
The “Christmas tree” cannot be laid on the carpet and similar coatings; it is necessary to free the floor from other coatings when reaching concrete or fiberboard. But even with fiberboard, a correct and even laying is not guaranteed, so it is necessary to fill in a screed of concrete or a self-leveling mixture.
Together with the laminate, a substrate is acquired, which is laid out over the entire area of the floor on which the "Christmas tree" will lie. But here, do not rush.
After the acquisition, the material must lie down in the room for at least a day in order for it to take the room temperature and take the form that corresponds to the given temperature.
Do you know what is the difficulty of laying a herringbone laminate? Share your experience in the comments.
Do you like the article? Subscribe to us in Yandex Zen. By subscribing, you will be aware of all the most interesting news. Go and subscribe.