A good owner always seeks to equip every corner of his home beautifully and, just as importantly, functionally. The balcony or loggia has long been transformed from a spare pantry into a useful room. In modern design, there is even a separate area responsible for this sector of the apartment. In this article I will talk about how to pick up, or make the table itself on the balcony or loggia.

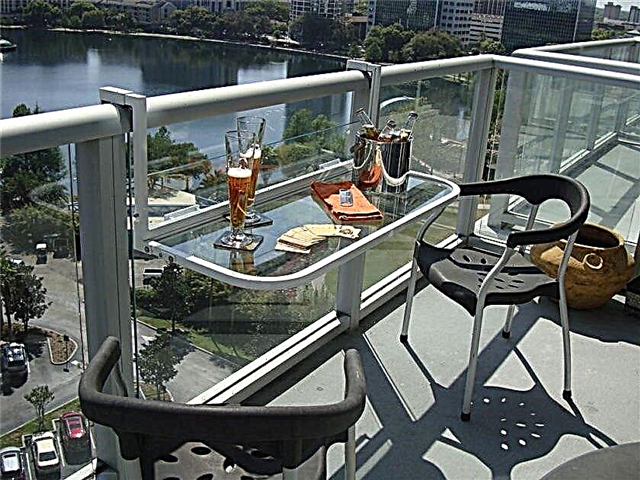
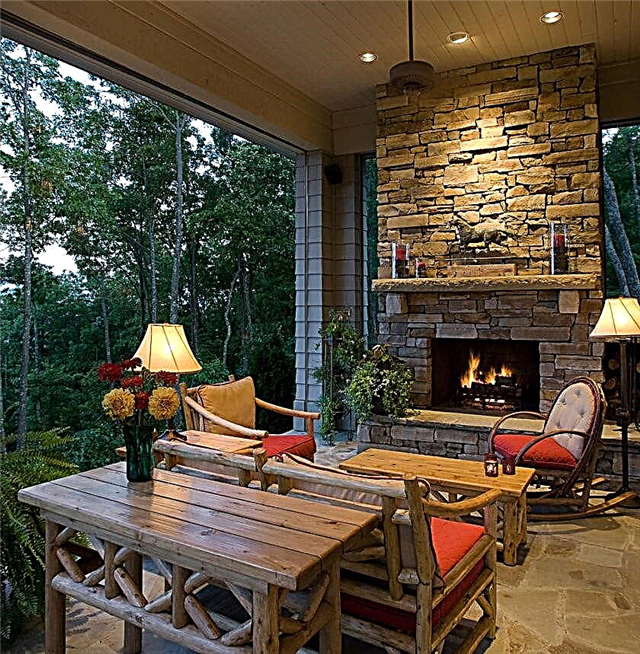
Folding furniture on a spacious balcony.
The problem of choice or flour of creativity
At one time, I set out to bring my loggia in proper form. And as it turned out, insulation, exterior and interior decoration is only part of the overall process. Equally important, correctly furnish the room.
You can install a cabinet or a standard desktop on the loggia P44T without any problems. For those who are not in the know, P44T is a marking of the project of modern houses with a free layout. But my apartment, like most of it, living in our country, was built according to a standard project in Soviet times.

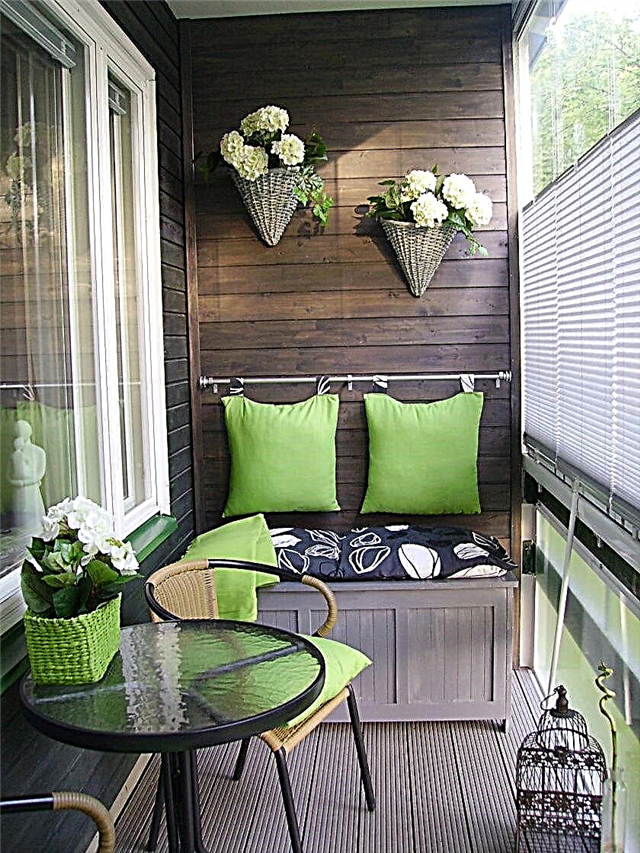
Furniture and desk on loggia P44T.
Almost everyone knows that the dimensions of such a loggia are rather modest, so a standard countertop, even from a small kitchen table, will look like an elephant in a china shop there. It required a small, compact and preferably somewhere retractable table. Of course, any furniture can now be ordered, but I used to do such small things myself, I have such a hobby.
Oddly enough this sounds, but the first problem I encountered is the choice of model. It seems to be a small thing, but there are many options. Here you immediately need to decide for what purpose you need such a table. And on which balcony are you going to put it.
The meaning of the table on the balcony
Russian balconies have a small area so do not litter with large dimensional furniture.

For such small areas, a folding table on the balcony is perfect. Such an item will be a good decorative component.

Folding tables on the balcony are highly versatile. They are suitable for a visual increase in the room.

Due to the fact that they add up space will be free there will be no problems with passage and movement. These items will become indispensable assistants.
A table on the balcony with your own hands is made or purchased in special stores.

Do it yourself will not cause difficulties and will look beautiful. Will bring personality to the interior.
Table application
A table on the balcony can be suitable for needlework, which needs lighting. Allows you to stay alone with your occupation.
The balcony can be adapted for snacks or tea in the evening.
If you do not have a workplace in the apartment, then you can make a computer table on the balcony. No one will be distracting and you can immerse yourself in silence in the work.

In the summer, it can be an excellent option for practicing with a child in the air. If you create a desk on the balcony, then your child can be happy to do.
Which table is better?
Small tables are popular. The stores offer a wide range of finished products. Their cost is diverse, for any wallet.
But it’s up to you to decide whether you are ready to buy or yourself. Since it depends on your skills and abilities. Also, many furniture makers offer to fulfill an order for manufacturing on individual projects.
To complete the table you need to have only desire. To make this item is not difficult and takes little time. But then such an item will become unique in the interior.


There are various methods to diversify a table using design elements. This is better to install under the window, then more natural light falls on it.

Rules for the selection of a shopping table
If your choice still fell on the finished furniture, then you should pay attention to two components of the right choice - this is the material and fasteners.
The choice of material depends on the type of balcony. If the balcony is completely glazed, then the material can be absolutely anything.

In the event that the balcony is open, then the material should be an iron or plastic object.

Wood tables are best not to be used in open spaces. When buying a wooden table, check with the seller if it is saturated with a solution against moisture. If not, then you should not buy, since such a table will not last long.


The choice of fasteners should be taken seriously. They must have high strength and reliability. Since the table will be used frequently. Fastener parts should be easily replaced.

For winter time, it should be dismantled, since during this period they do not go to the balcony and the table may be deformed.

How to make a table on the balcony?
One of the most popular materials for making a table is wood. You can use plywood, short, cheap and practical in properties.

From the beginning, determine the type of table for which purpose you will use. Design on paper.

Create a design will help photo table on the balcony, then you can understand what in fact go to see in your room.
- Calculate the amount of material required components and equipment for the job.
- The final stage is the implementation of all types of work on the table.


There are many designs and styles for decorating a balcony. A table can take many forms, depending on your taste and desire.
Preparation for work
When creating furniture for a balcony with your own hands, you must consider:
- Compact and versatile. It is worth forgetting about the large and wide forms: modern interiors require simplicity, besides the loggias are simply not adapted for bulky options.
- Material. For open balconies, metal or wood structures with special impregnation from an antifungal agent and a fireproof layer are suitable. You can make a table with your own hands made of plastic, which is popular today due to its unpretentiousness. Please note: white plastic does not tolerate sunlight. Under their influence, it can exfoliate, emitting an unpleasant odor. Therefore, it is not recommended to install such a table on the sunny side.
For insulated rooms (balcony with European-quality repair) any furniture is suitable. It will be well maintained. It is worth paying attention to a table made of natural wood or chipboard as a budget option.
- The form. Of the various models of furniture for the loggia, the folding table has the most advantages. It is small-sized and as comfortable as possible, fits perfectly on any balcony, does not block the passage and does not take up much space. Making such a product for a loggia with your own hands is very simple, following the instructions.
Step-by-step manufacturing instructions
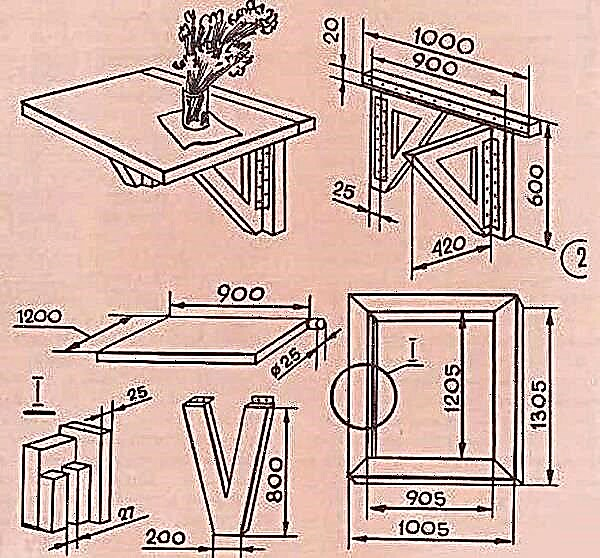
- chipboard or plywood 2.5 cm thick (dimensions: 1 piece 40 × 80 cm, 2 pieces 20 × 60 cm, strip - 5 × 80 cm),
- jigsaw or circular saw,
- hammer drill
- medium grain sandpaper
- 2 loops or metal corners,
- 4 long screws
- engineering compass,
- clear varnish or paint for wood.

Do-it-yourself folding table should be started with the design of the bottom cover. For this, one of the boards of size 20 × 60 is taken and divided into 2 triangles. In one of them three holes of different diameters are cut. The center of each circle should be located 7 cm from the long side of the part. This ensures the beauty and originality of the design. Please note: when working with chipboard, you do not need to press the saw hard. This may cause delamination or cracking. Then the sheet will be unusable.

The second 20 × 60 board is the base that will hold the finished table. The edges are cut in a semicircle and sanded with sandpaper. The contours of the corners are easy to draw with a regular mug. Note that you can cut any shape, such as a square or rectangle. To make such a table is simple using a regular circular. However, as practice shows, a semicircle-shaped table that does not have sharp edges that you can catch on fits better on the balcony.
 > Step 3.
Now you need to fasten the received parts. A triangle is attached to the middle of the finished board using a long metal loop. The most important thing is that the triangle is 3-4 mm lower from the upper border. Then the lid will not scratch the folding part while driving.
We proceed to the preliminary assembly. The lower part of the structure is placed on the cover with an attached folding strip. This will help ensure that the metal loop does not interfere with movement. After that, a plywood strip is attached to a wide part of the furniture with 2 joinery hinges. A table that is designed with your own hands for a balcony will be more durable provided that you use high-quality fittings, since it is it that must support the weight of the entire structure.
The final stage in the manufacture of furniture with your own hands is installation. It is better to fix the table on the balcony to the wall under the window that goes from the apartment to the street - this is ideal. Pre-mark on the wall the place where the table will be located. We fix the lower part with a triangle for 4 screws, then the hinged cover for another 4 screws (if the walls are thick, then you can use screws).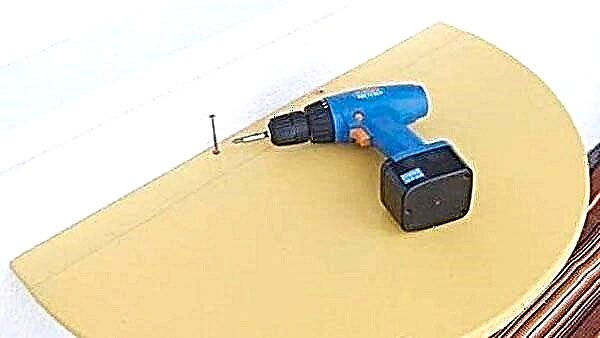
To make the table more attractive and durable, it must be coated with a colorless varnish with water-repellent impregnation. You can also use special paint for wood. Proper coverage allows you to operate the table on the balcony for many years.
Buying a finished table in a store
Owners of balconies who love factory furniture should contact a distribution network for a folding table. Here you can choose quality furniture for various purposes.
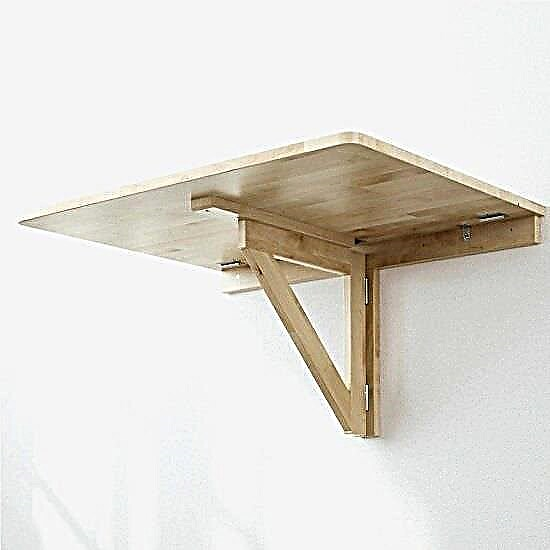 Folding table from Ikea
In order for the table to fit a particular balcony, in addition to shape and size, the following model features are important.
High-quality models for balconies are made of materials that are not afraid of sudden changes in temperature and moisture. The choice of model depends, first of all, on the style of the balcony space and its condition.
 Kitchen countertop folding table
For a glazed balcony, furniture from any environmentally friendly material is suitable.
On an open balcony, the material must be resistant to environmental hazards.
- Transformation Method.
The convenience of operating any model, as well as the safety of the family, depends on the folding method.
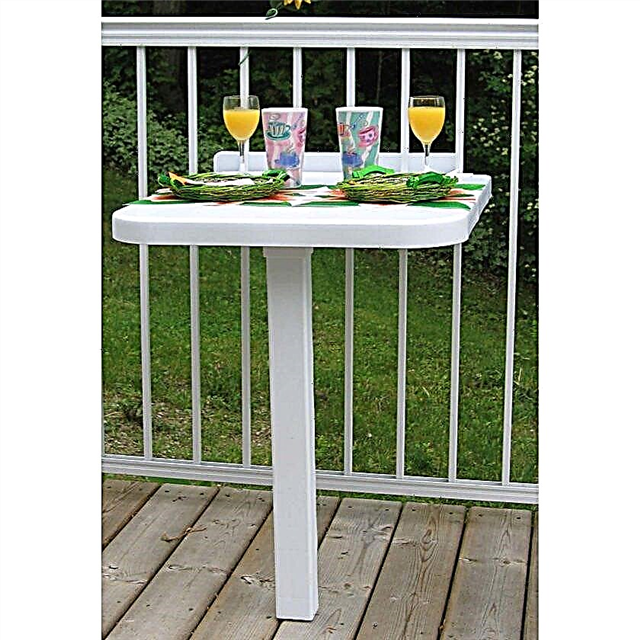
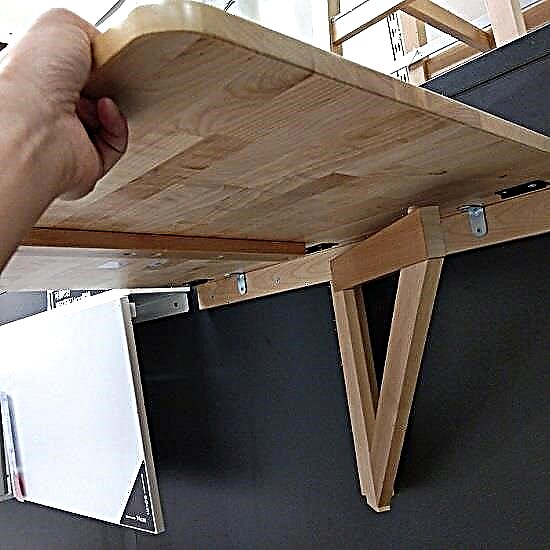
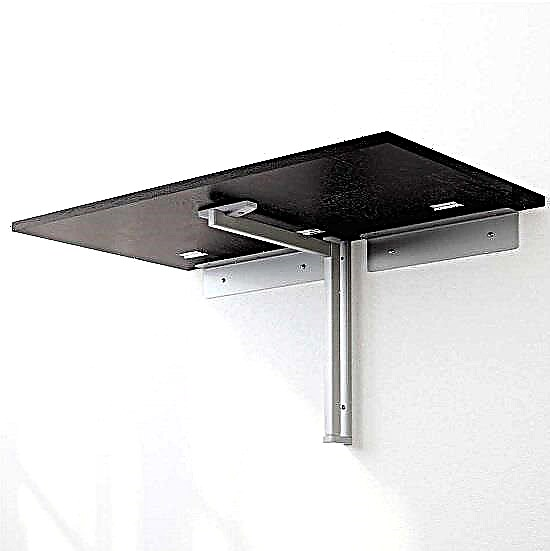
 You can buy folding brackets for countertops
A table with a retractable foot that folds easily poses a danger to young children. An awkward movement is enough for the countertop to fall on a support. Folding furniture must have a secure fit.
- Easy to mount.
Quality folding tables are sold assembled. The only requirement is to mount the product on the wall. The kit should include fasteners and instructions.
 Wall-mounted folding table - IKEA - bjurst
The fastening should not cause any difficulties for the user, but take up little time.
Preparation for self-made table
Making a folding table begins with the preparatory work.
In some cases, the dismantling of the facing material for the installation of embedded bars. On the fortified wall, the cladding is restored.
- Material is being prepared.
The main consumption of material falls on the countertop. Well, if the material is not very thick and easy to process. The following materials are considered the most popular:
- hardwood
- Chipboard
- profiled board (lining).


- Tool is getting ready.
The standard tool kit includes:
- electric jigsaw
- hammer drill or drill,
- screwdriver or screwdriver,
- pencil, tape measure, level and marking devices.
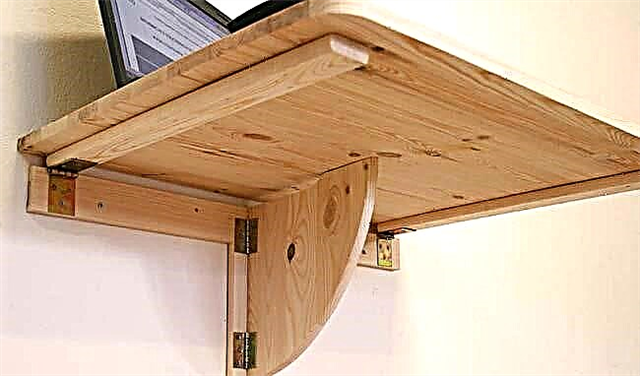
Making a wooden table
For a wooden countertop, any shape is chosen. The side that will be adjacent to the base is made in a straightforward form. Such a construction is made in stages.
First stepmanufacturing countertops.

Dimensions and shape are determined before the start of work. As a rule, choose a semicircular shape. A strong, durable table is obtained from a thick wooden canvas up to 3 cm.
The operations are performed in the following sequence:
- mark the wooden canvas
- they cut the workpiece with an electric jigsaw,
- align the slice.
The second stage is the manufacture of power parts.
 To ensure that the table is reliably supported in the open state, a rotary leg is cut out of the same wood sheet as the countertop.
Special care requires the manufacture of a vertical base that will hold the swivel foot.
The third stage is the processing of blanks.
For aesthetic appeal, all workpieces must be carefully sanded and then polished. Any barbs or irregularities in contact can cause damage to clothing or personal injury.
The sequence of operations at this stage is as follows:
- parts are cleaned with sandpaper, and then with special nozzles on an electric drill,
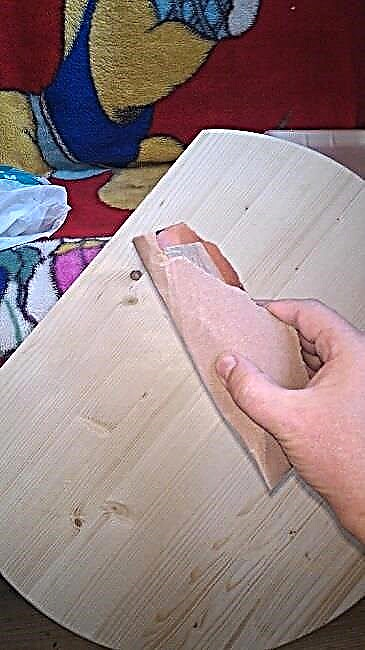 Grind the table with sandpaper (null)
- apply antiseptic and varnish coatings. They create reliable protection against fungus, emphasize the shade of the tree.
The fourth stage - product assembly.
Speed up the assembly process, improve its quality should be a cordless screwdriver. With its help, the following operations are performed:
- a vertical base is fixed with screws to the wall. The main load will fall on it, so mortgage bars were provided in advance,
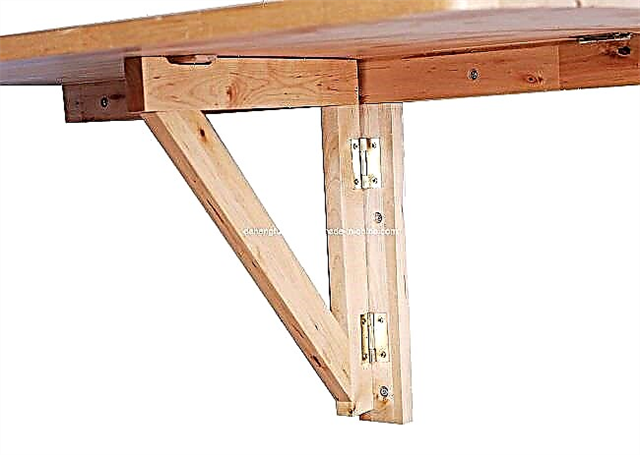

- with the help of hinges, the suspension stop is screwed to the base
- a countertop is mounted on the suspension frame. Mounting to the wall is done with furniture hinges on the screws. The folding element is positioned so that it recedes from the wall by the thickness of the vertical base. The free gap is closed with a thin plank of wood.
Making a table from chipboard
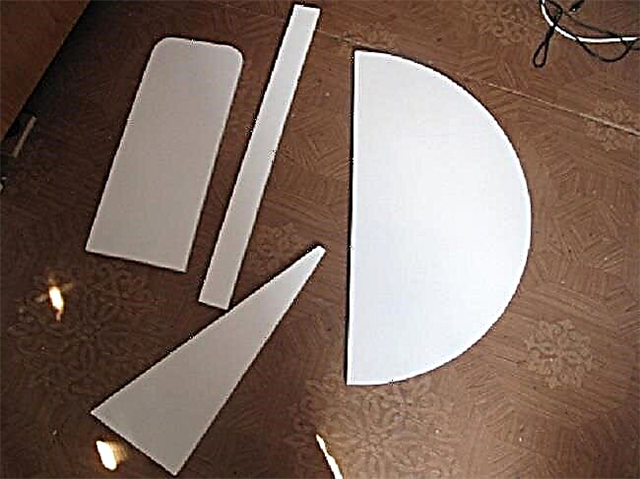
It is very simple to make a table from chipboard. It consists of four parts: countertops, two rectangles and a triangle.

Phased production is as follows.
The first stage is the manufacture of countertops.
- marking is made on the chipboard plate. For example, choose a semicircle wide
400 mm, length 800 mm,
- the workpiece is cut with an electric jigsaw,
- the sides of the workpiece are smoothed out with a file, and then with sandpaper,
- places of cuts are covered with a protective compound, varnish or paint.
 We paint our blanks with white enamel in 2 layers
 We paint our blanks with white enamel in 2 layers
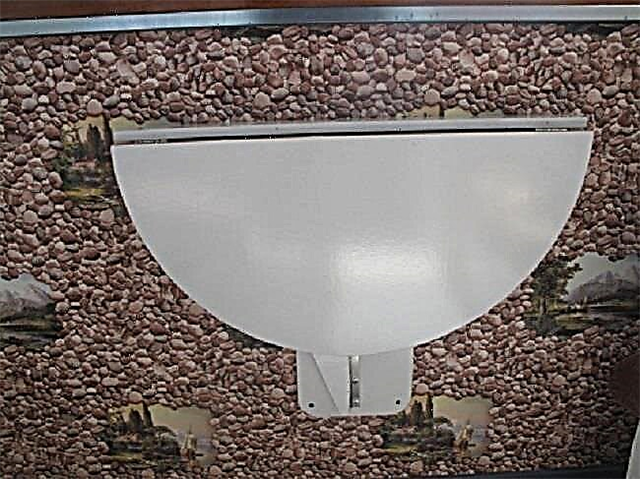
The second stage is the manufacture of the support.
Reliability of the structure depends on the condition of the support. In the tilted state, the support is closed by a countertop.
Support elements are made of the same chipboard plate for the size of the countertop in the following sequence:
- cut a rectangular blank 880 x 100 mm long. It will be the base to which the hinges for the countertops will be screwed,
- cut a rectangular workpiece with dimensions of 200 x 600 mm. A reclining support element will be mounted on it,
- cut a triangle with sides 300 x 600 mm. He will be the support for the countertops,
- polished workpieces, and then they are coated with protective compounds.
The third stage - assembly of the structure.
This is the final stage, which includes:
- fastening to the wall of a rectangular base under a vertical support,
- installation in the upper part of the base of a rectangular blank for fixing the countertops,
- fastening hinges to the countertop and to the support,


- loop fastening of the countertop to the upper rectangular workpiece, and loop support to the rectangular base.
 The table is ready and waiting for its guests
 The table is ready and waiting for its guests
Making a table out of lining
Very often, after cladding the walls of the balcony with clapboard, unused material remains. It is easy to make an original folding table with rest from residues and scraps.

The manufacturing process is divided into stages.
 The scheme of manufacturing a table with emphasis
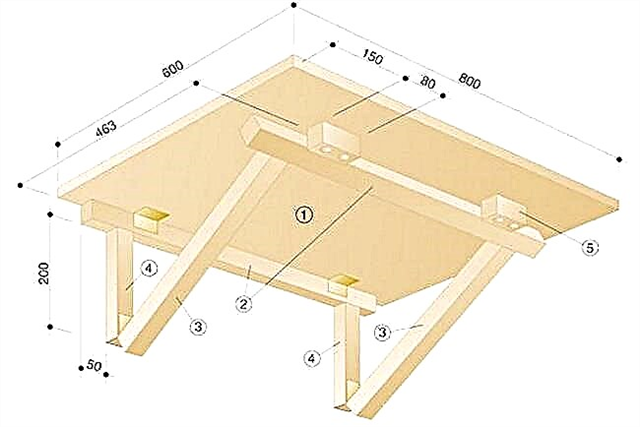 Drawing of a table with a support frame
The first stage is the manufacture of countertops.
To make a rectangular countertop measuring 70 x 60 cm, you must:
- connect 4 lamellas 70 cm long with a spike-groove system into a single whole. For reliable fixation, the joints are lubricated with glue, and on the bottom side they are strengthened with furniture staples,
- round the corners of the structure. Cut the side spike,
- Coat the sides of the tabletop with a protective compound and varnish.
The second stage is the manufacture of supporting parts.
As supporting elements, 6 cm thick slats are used, or blanks are cut from the lining.
There should be ten such blanks:
- base for vertical mounting to a wall 75 cm long,
- basis for horizontal fastening to a wall 60 cm long,
- 4 vertical racks 75 cm long,
- 4 horizontal crossbars 30 cm long.
All blanks are cleaned with sandpaper, and then coated with a protective compound and varnish.
Racks and crossbars are connected with self-tapping screws to get 2 frames.
 If you want a bigger table - two supports are made
Stage three - assembly of the structure.
- with the help of anchors, a vertical and horizontal base is attached to the wall,
- 2 frames are attached to the vertical base on furniture hinges,
- to the horizontal base on furniture hinges they fix the countertop.
Thanks to the hinges, the countertop easily reclines and rests on the extended frames.
In the video, an option with a retaining leg:
Folding table decor
Some users want to decorate the balcony table. To do this, it is not enough to cover the wooden surface of the countertop with varnish. Decoration required.
The ends of the countertops are decorated with a lining of aluminum. It is fastened with self-tapping screws.
Handy materials are suitable for surface decor: textiles, tiles, shells, wallpapers, etc. Perform the following types of decor.
- Mosaic pattern.
Tiles with dimensions not exceeding 20 mm will be required. It is sold on canvas. It is necessary to cut the canvas, separate, stick each tile, and then wipe the seams with a special compound.
Here is a great video tutorial:
A more time-consuming option is to use shells or pebbles for mosaics. A nautical theme appears.
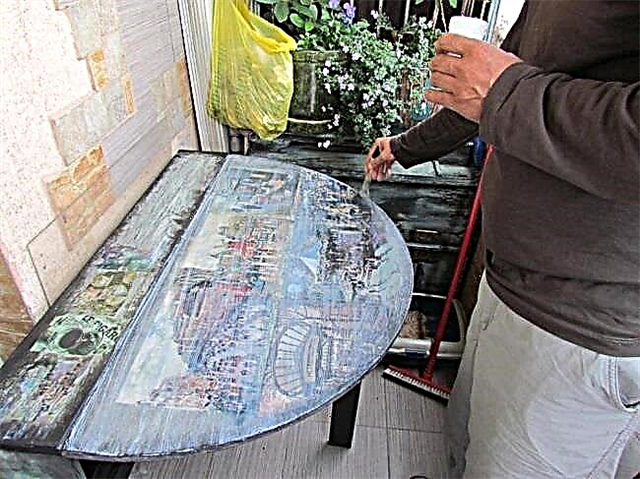
- Decoupage surface.

Such decor is performed with improvised materials. These are paper, fabrics, various objects.
Before decoration, an acrylic primer is applied to the prepared surface. The dried surface is covered with a layer of PVA glue, on which patterns from paper, fabrics, photographs are laid. At the final stage, the decor obtained is varnished, then dried.
- Drawings on the surface.

Paints allow you to create unique drawings. This requires imagination, two colors of paint, a stencil of paper. Decorating is performed in the following sequence:
- the prepared surface is painted with white paint,
- the drawing is printed and cut out of paper. It can be an image of flowers, birds, butterflies, much more,
- the stencil is attached to the surface, and then the free areas are painted with the color of the selected decor. When the paint dries, the stencil is removed and a paint polish is applied.
So, when a folding table appeared on the balcony, you need to pick up comfortable chairs or stools for it. Such a set of furniture will create coziness and comfort.
Advantages and disadvantages
Like any piece of furniture, a folding table on the balcony has its advantages and disadvantages. The advantages of the products include the following.
- Wall construction can be both unfolded and folded. If necessary, decomposing a similar unit, it can be immediately removed after use by placing the surface of the countertop along the wall. Due to such a mechanism when folded, such a table occupies a minimum of space and allows you to use the maximum of the balcony area for various other purposes.
- The table located by the window is always well lit, and the placement near the window will allow you to enjoy the view during the operation of the product and create a special atmosphere.
- These tables can be used simultaneously by 2 or even 3 people, which makes it quite suitable for a small family or couple.
- With this piece of furniture you can zoning the space of the balcony. It can become both a part of the recreation area, and a full-fledged workspace. With proper location, the table will help in dividing the balcony into functional sections.
- You can use this product for various purposes, including as a place to store various things.
- Since the models of such furniture are very diverse, with their help you can successfully complement the concept of the interior in which the balcony is decorated.
- The folding unit can be installed in almost any part of the balcony room. It can be on the largest wall, on the wall near the window, at the end of the balcony or even in the arched opening, if any.
- For many, an additional advantage of such furniture is the ability to make it yourself.
Even a person with little experience in this matter will not find the process of creating this balcony attribute difficult.


Of the minuses that are characteristic for finding such a product on the balcony, the following nuances can be mentioned.
- It is advisable to install these tables only on insulated balconies. Otherwise, the temperature in the cold seasons may be too low, and in warm furniture it will be uncomfortable to use because of the heat.
- Also, more dust accumulates on the balcony, so these tables require more frequent cleaning.